


So you’ve got a shiny new website? (Best. Feeling. Ever.). But is it showing up in search engine results? Contrary to popular belief, Google is not omniscient (shock horror, I know!). Google doesn’t magically know about every new website that is ever launched. It also doesn’t know when you’ve added a new page or deleted an old one. We have to tell it!
The way to do this is through a little thing called a “sitemap”. Think of the internet as an ever-changing planet. New towns, and houses, and streets are popping up all the time. In order to get those places on the map, we have to alert the right person. Not only that, we have to make sure the right person has the right information about our new town, or street, or house. In the case of a new website, Google is the most important “right person”. And everything they need to know about your website is housed in a special (and looong) piece of code, called a “sitemap”
What are sitemaps? Why are they important?
Sitemaps are a virtual blueprint that guides search engines to index the pages of your website. It’s a condensed version of your site that helps search engines to find, crawl and make a log of all of the content available there. If paired with your SEO practices and strategy, it will help you bring traffic to your website and increase your ranking in the search results.
How do sitemaps help with SEO on Showit?
Your sitemap tells Google that your Showit website exists and that you want it to show up in it’s search engine rankings. Sitemaps are important for SEO because they make it easy for Google to find all your website’s pages. Remember that Google ranks web pages (including individual blog posts) and not just whole websites.
How do sitemaps and SEO work together?
It’s important to keep your sitemap updated as you make changes to your website. You’ll be able to rank higher in search results by using a combination of SEO strategies. These include keyword optimisation, content marketing, link building and the list goes on. So, as your sitemap tells you which pages of your site are the most relevant, you also need to offer value through good SEO practices.
Submitting your sitemap to Google is a simple, two-step process and you should be done and dusted within ten minutes. Let’s get started!
Step One: Find Your Showit Sitemap
First we need to find your sitemap! There are two ways that you can do this.
- Use the Showit Sitemap URL (if you are a Showit user)
- Install the Yoast SEO plugin in WordPress
You might be wondering, “What if I have both a Showit website and a Showit blog? Do I need to submit two separate sitemaps or just one?”
If you only have a Showit website, then you only need to submit one sitemap. On the other hand, if you have a Showit website and blog, you will need to submit two sitemaps, one for your website and one for your blog. The main reason is to ensure that all pages are crawled and indexed by Google. It’s an efficient way in classifying and categorising the content in your website. We highly recommend that you submit multiple sitemaps especially for pages that are constantly being updated or highly-classified such as portfolio pages and landing pages. This helps better your online visibility and enhances your SEO.
How to find your Showit pages sitemap
Once you’ve published your website, Showit will automatically generate a sitemap for you, yay! You can also find your sitemap by going to: yourdomain.com/siteinfo.xml.
Simply place in your own domain. For example, using Hello Magic Studio’s domain: http://hellomagic.io/siteinfo.xml.
How to find your blog posts sitemap
Our preferred method of generating a sitemap for blog posts is by installing the Yoast SEO Plugin. Since blogs will be regularly updated, this is a good practice to benefit from a sitemap so that each post can be indexed easily by search engines.
- Install the Yoast plugin and activate it.
- Go to “SEO” > “General” in the left navigation menu.
- Go to the Features tab and find XML Sitemap.
- Click the sitemap tab to “Enabled.”
- Click on the question mark icon next to “XML Sitemap”.
- You’ll find a hyperlink to your sitemap. Click on “See the XML Sitemap.”
- There you’ll find a list of your blog’s sitemap URLs. Each of these URLs should be individually submitted to Google (see Step Two!)
Step Two: Submit Your Showit Sitemap to Google Search Console
If this is your first time to use Google Search Console, you will be required to make an account. It’s free and easy if you already have a Google account.
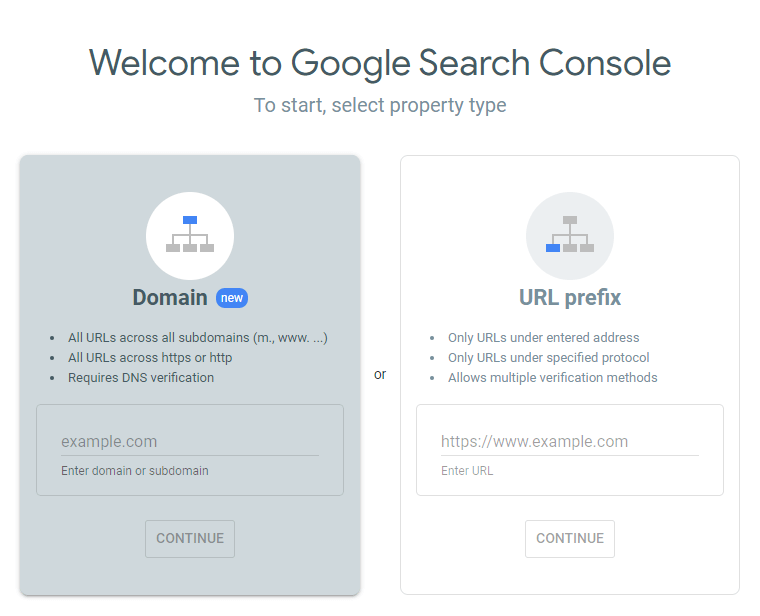
You’ll then be asked to select a property type.
1. Add your domain name in the Domain field and follow the instructions to complete the verification process.
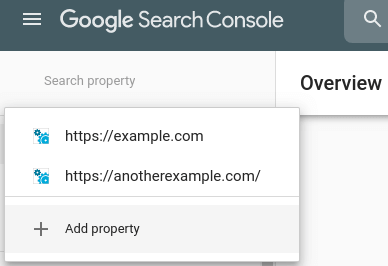
2. In the sidebar, select your website.
3. Click on “Sitemaps”. The “Sitemaps” menu is under the “Index” section.
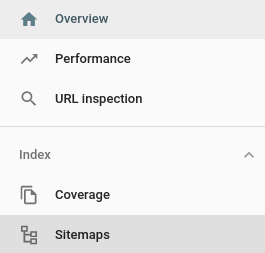
4. Enter your sitemap URL in the “Add a new sitemap” field.

5. Click “Submit”!
And you’re done! Once you’ve submitted your sitemap to Google, your website is on it’s way to being found and ranked in the Google search results. Remember to repeat this process anytime you make an update to the structure of your website, by adding or deleting pages.
PSSST…! Want this task done for you?! We include it as part of our SEO & Pinterest Optimisation package! Learn more about it here.
Where to next?
- Check out our helpful strategies for staying motivated in business.
- If you’re a new business owner and you need a foolproof strategy to name your business, we’ve got a treat for you!
- Ever heard of the One Concept Method? Want to know why we use it to create strategy-led brand design? Read more about it.
At Hello Magic, we are in love with Showit. We’re all about building beautiful websites that attract your dream customers and the only thing better than a gorgeous online home is a gorgeous online home that converts. To get the best of both worlds, you need to know how to optimise your Showit site for SEO.

Excellent photography is one of the key ingredients in a show-stopping, stand-out-from-the-crowd kind of website. Here are our top tips for planning a brand photoshoot that will produce website-worthy images.

“Should I use Showit or Squarespace for my website?” This is a question we hear from many clients. And no wonder. Figuring out whether you should create a website using Squarespace or Showit is like trying to find a consensus over whether pineapple belongs on pizza or not.

Are you considering investing in professional branding or a rebranding project but unsure if it’s even worth it? It’s a valid concern. After all, there are many factors to take into account when making such an important decision for your business. To help you out, we’ll share with you a few cold, hard stats about the benefits of branding that just might convince you to take the plunge.

Template or custom: which is right for you? In this post, we compare all the differences between a custom Showit design and a Showit premade template to figure out which option is best for you and your business.


At Hello Magic, we are in love with Showit. We’re all about building beautiful websites that attract your dream customers and the only thing better than a gorgeous online home is a gorgeous online home that converts. To get the best of both worlds, you need to know how to optimise your Showit site for SEO.
Are you considering investing in professional branding or a rebranding project but unsure if it’s even worth it? It’s a valid concern. After all, there are many factors to take into account when making such an important decision for your business. To help you out, we’ll share with you a few cold, hard stats about the benefits of branding that just might convince you to take the plunge.